Chapter 9 — The History Panel
The History Brush
The History Brush Tool is a useful little item that allows you to step just parts of your image forward or backward to a later or earlier History state (which you choose from the History Panel). It's difficult to imagine without actually doing it so let's go through a couple of examples.
Start by downloading this photo: www.robertstech.com/fotoshop/torquay.php
It's an image from a scanned slide and, is often the case with scanned slides, there are some dust spots spoiling it, particularly evident in the sky. We could remove them with the Clone Tool or the Spot Healing Brush, but we'll try a couple of techniques using the Dust & Scratches Filter and the History Brush instead.
 Step 1: The Dust & Scratches Filter
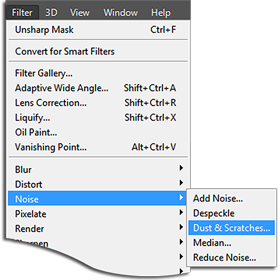
Start by zooming in to 100% magnification to get a good look at the dust spots. Then open the Dust & Scratches Filter by choosing Filter > Noise > Dust & Scratches... from the main menu.
The Dust and Scratches Filter can do more harm than good if used clumsily, so we'll start by moving its settings to their minimum effectiveness:
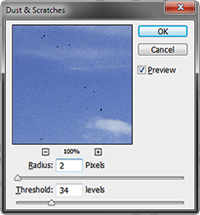
Set the Radius value to 0px (this is the minimum size of the spot the filter will try to remove; bigger settings remove bigger spots but sacrifice a lot of image detail). Smaller settings have smaller effect.
Set the Threshold value to 255 levels. This sets the minimum level of contrast before the filter considers something a spot (as opposed to desirable image data); with this control smaller settings cause greater effect (and more loss of sharpness).
 Now click and drag in the Filter's Preview window (shown at right) until you come to part of the image with a good group of dust sport. Near the upper left-hand corner is good.
"Guestimate" the size of the largest spot – 2 or three pixels should be about right for this image – and set the Radius to that value. You won't see any difference at this point.
Next, start gradually moving the Threshold setting down. The effect should become visible around 100 and you shouldn't need to go lower than 32–34. (When working with other images you'll typically go back and ajust the Radius a little again and then go back, and tweak the Threshold a bit bore to get the best result.) Click OK.
Zoom out so you can see the entire image. Your dust spots in the sky will all be gone! But... you'll have lost a lot of detail in the sea and ground — press Ctrl+Z (Win) or Cmd+Z (Mac) a couple of times to see a before/after comparison. To fix that we'll use the History Brush. We'll try two different approaches using this tool.
Step 2(a): The History Brush Tool
 Having removed the dust spots with the Dust & Scratches Filter, open the History Panel.
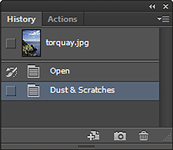
It should resemble the illustration at right, showing only two History States: "Open" and "Dust & Scratches",
the latter being highlighted as the current state. Click on the small square at the left edge of the "Open" state and a History Brush icon will appear there (as shown).
Be sure to click only the History Brush icon and not the History State itself — the Dust & Scratches state should remain highlighted. Your History Panel should look like the one at right.
We're going to brush the earlier History State back onto parts of our image.
 Find the History Brush Tool in the Photoshop Toolbar; it's just above the Eraser Tool and below the Clone Tool.
Choose the History Brush Tool and adjust its brush settings – just like the standard Brush Tool you're familiar with – to get a round brush with
a diameter of 150px and hardness of 0.
Brush over the ground, rocks and sea and watch as all the detail comes back: Wherever you brush will be "transported back in time" to the History State in the History Panel which has the History Brush icon.
Pretty cool? Yes. But don't save the image: We're going to remove these spots using an alternate approach with the History Brush. Close without saving so we can use this other approach.
Step 2(b): The History Brush Tool
Open the Torquay.jpg image with the dust spots again and apply the Dust & Scratches Filter exactly as before (same settings).
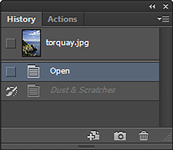
Now, in the History Panel, click on the "Open" History state to highlight it — your image will now appear as it first did with all the dust spots.
 Next, click on the small square at the left edge of the "Dust & Scratches" History State to make the History Brush icon appear there.
Your History Panel should now look as shown here at right.
We've taken the whole image "back in time" to the state it was in when first opened. But wherever we brush with the History Brush now will be transported "forward in time" to after the application of the Dust & Scratches Filter.
As before, choose the History Brush Tool from the toolbar. This time set the brush size to 10px and the Hardness of 80%. Zoom in to 100% magnification and click on any dust spot you want to remove.
Which is Better?
In our example, the "Step 2a" approach was obviously quicker and less labor-intensive than the procedure used for "Step 2b". But in images with more complex areas to keep sharp (or with fewer dust spots) the second approach might be better. And of course the History Brush can be used for many other applications besides applying/undoing this specific filter, but this example should demonstrate the general principles and how the tool is used.