Chapter 8 — Adjustments
Let's take a look at some of the Adjustments that weren't covered in the book. Some of these are aimed at photographers more than graphic designers but everyone can find some situations in which they're useful.
Exposure
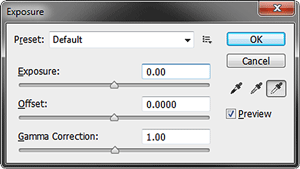
 will bring up the Exposure dialog shown here.
This tool is intended to simulate the effect of changing your camera's exposure settings: If your image came out overexposed or underexposed this tool is here to help you fix it. In this respect it's similar to the Shadow/Highlights Adjustment, but Exposure has broader effects and works all through the exposure range — mid-tones in addition to shadows and highlights. It also has the benefit of being easier to use because there are only three settings to deal with: Exposure, Offset and Gamma Correction.
Exposure
The Exposure slider is your main setting in this tool and the one you should adjust first. As is appropriate for a photographer's instrument, it's calibrated in f-stops. An f-stop represents a doubling (or halving) of light intensity: it's like halving/doubling your shutter speed or lens aperture. Although it works over a broad range, the Exposure slider seems to affect brighter areas more than shadows.
Offset
The oddly-named Offset control works mostly in the shadows, somewhat in the mid-tones and very little in the highlights. As a result, it appears to either pull down the shadows (when moved left) or wash out the highlights (if moved right). In general, you'll use Offset to counteract the Exposure slider if it has brightened the shadows too much.
Gamma Correction
The Gamma Correction slider works just like the gamma (middle) slider in the Levels Tool. It leaves the white point and black point unaffected while moving everything in between toward brighter or darker values, with tones in the middle most strongly affected.
Eyedroppers
The eyedroppers are used to set the black point, gray balance and white point of your image, exactly as they do in the Levels Tool. The white and black point eyedroppers aren't particularly useful (you're better off doing this manually with the Levels Tool) but the Gray Balance eyedropper can be very helpful at times. Just click it on part of your image that you know should be neutral toned (gray) and it will alter the color balance of your image appropriately.
Exposure is also available as an Adjustment Layer through the Layers Panel.
Photo Filter
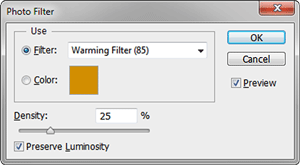
 Use to bring up this photographic tool.
Photo Filter is designed to mimic the effects of verious colored filters photographers have been using on their lenses since the beginning of photography. Now they more often (but not always!) use Photoshop to get the effects they want.
You can click the color swatch next to the word "Color" and set the color of your virtual filter using the Photoshop Color Picker. But this tool is more often used by making it emulate a traditional photographic filter by choosing one in the drop-down list.
 Most of the filter options in the drop-down list are self-explanatory and as long as you have the Preview box checked you'll be able to see their effects
instantly, but the first few options, shown at right, deserve some explanation.
Wratten is a series of filters marketed by Kodak since 1912 (and available through Tiffen today) and LBA/LBB are series of filters made by Fuji. Kodak Wratten 85 is a "warming filter" and is equivalent to the Fuji LBA-12 and is used for shooting indoor balanced film outdoors; you can use the Photo Filter "Warming Filter 85" or "Warming Filter LBA" to correct for a photo that was shot outdoors with the camera mistakenly set to "Indoors" or "Tungsten" color balance.
Wratten 82 or Fuji LLB-2 ("Cooling Filter 82" or "Cooling Filter LBB") can be used in the opposite situation, when you have a photograph shot indoors with a camera set for daylight color balance.
The 80 and 81 Wratten emulations are intended not to correct for film types or camera settings but to give either a cooler (more bluish) or warmer (more red-orang) color balance to images.
All the other options in the drop-down list are quite self-explanatory, just emphasizing the color indicated. The "Underwater" setting attempts to make your scen loos as if it has been photographed underwater (you can decide for yourself how successful it is).
Density
Kodak Wratten filters usually lave a letter suffix (A, B, C) to denote how strong their effect is. In the Photoshop Photo Filter we use the Density slider to control this. The higher the setting, the more pronounced the effect.
Preserve Luminosity
Obviously, adding a photographic filter blocks out some range of colors and, in the case of physical filters on a camera lens, makes the image darker. The Photo Filter Adjustment lets you compensate for this automatically. If you have the Preserve Luminosity box checked Photoshop will automatically increase the overall brightness of your image to compensate for the darkening effect of the filter.
Photo Filter is also available as an Adjustment Layer through the Layers Panel.