 Ever since the publication of the PDML Photo Annual (see link and photo at right), I’ve had a lot of people asking me how the photo mosaic on the cover was made. The answer is disappointingly mundane: I had software do it for me. Yes, there was no special skill involved (other than choosing an image that is well suited to this technique). Better still, the software I used was freeware. It doesn’t cost anything.
There are several applications available to create photo mosaics. I haven’t tried many; in fact, I’ve only tried one because the first one I downloaded worked so well that I didn’t feel the need to spend any more time searching. It’s an application called Andrea Mosaic and is one of the free photo applications recommended on my free software page. You can download it at Andrea Denzler’s web site. Here’s how it works…
Using the Software
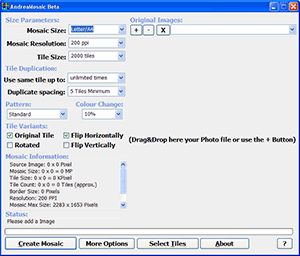
 The main interface of Andrea Mosaic is shown at right.
The first step is to select the characteristics you want for the final mosaic: Physical size, resolution and number of tiles.
Next choose the image that will be the “master”; the one you want shown in the form of a mosaic. You can drag and drop it into the large gay area in the right side of the window, or click the “+” button and navigate to the image file you want to use.
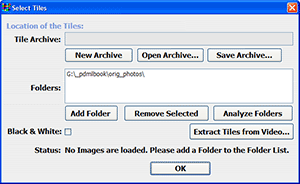
Step 3 is to choose the images you want to use as mosaic tiles. It’s best if you put these images — preferably copies of the original image files — all into one directory (folder) just for the purposes of making the mosaic. Click the “Select Tiles” button at the bottom of the window. This will open a new window and you have to go through a 3-step sub-process here:
 Click on “Add Folder” and choose the location where you placed the images you’re going to use.
Click on “Analyze Folders” to make the software mathematically examine the images you’ve chosen. This can take several minutes if you have a lot of large images.
Click on “Save Archive” so you don’t have to perform the first two steps again for this collection of images.
Then you can click on “OK” to go back to the main window.
Now, back in the main window you can just click “Create Mosaic”. If you want, you can change the optional settings for how many times to use an individual tile, how closely duplicate tiles may be spaced and whether you want to let the software rotate or change the color of the tiles to create a more convincing final result. It’s likely that you’ll have to go through a little trial and error process to get an image looking its best.
This is a fairly computation-intensive process, so you may have a significant wait while the software does its work. With large output sizes I’ve had to let it run for around 30 minutes even on a fast computer, but that’s still many thousands of times better than trying do perform this kind of process manually in Photoshop!
Finishing Touches
If you have Photoshop, you can perform the usual color and levels adjustments on the final mosaic when it’s complete. In some cases I’ve also layered the original “master” image on top of the mosaic, with its transparency set at 30-50%, in order to make the effect more subtle.
In short, making a photo mosaic is neither costly nor difficult. Try it out on your own images and experiment. You’ll find it’s a great finishing touch to a collection of images.

Cool,
thanks for the help and introducing this software to me, keep up the good work
Anyway, thanks for the post